Difference between revisions of "Appendix: XML mapping GUI"
m (Onea moved page Appendix: XmlMappingGui to Appendix: XML mapping GUI: wrong name) |
|||
| Line 1: | Line 1: | ||
| − | =Goal= | + | ==Goal== |
| − | + | To be able to support as much e-invoicing formats as possible, we developed a solution that enables the users to create a custom mapping of XML files. | |
| − | + | ==Identify XML== | |
| − | + | To be able to import different XML types, you have to identify which kind of XML is used. There are different identifiers available: | |
| − | + | * the name of the root element | |
| − | + | * the namespace of the root element | |
| − | =Identify XML= | + | <br/>{{note|It is discouraged to work with empty namespaces. If two vendors would use empty namespaces and their root element would be the same, XML's will be confused.}}<br/> |
| − | To be able to import different | + | * values of certain elements |
| − | + | <br/>{{note|These elements are fixed for a certain root element (and its namespace).}}<br/> | |
| − | |||
| − | It is | ||
| − | |||
| − | |||
| − | |||
| − | |||
| − | |||
| − | |||
| − | |||
| − | |||
| − | + | ===Examples=== | |
| + | '''Example 1'''<br/> | ||
| + | <code><?xml version="1.0" encoding="UTF-8"?> <Invoice> <amount></amount> ... </Invoice></code><br/> | ||
| + | * root element will be ''Invoice'' | ||
| + | * empty namespace | ||
| + | * no other identifying elements | ||
| + | <br/>{{warning|This setup is strongly discouraged}}<br/> | ||
| − | + | '''Example 2'''<br/> | |
| − | + | <code><?xml version="1.0" encoding="UTF-8"?> <Invoice> <implementation>customer 1</implementation> <amount></amount> ... </Invoice></code><br/> | |
| − | : | + | * root element will be ''Invoice'' |
| − | + | * empty namespace | |
| − | + | * ''implementation'' is an additional identifier for this root | |
| − | + | <br/> | |
| − | + | Following XML defines its own mapping:<br/> | |
| − | + | <code><?xml version="1.0" encoding="UTF-8"?> <Invoice> <implementation>customer 2</implementation> <amountPaid></amountPaid> ... </Invoice></code><br/> | |
| − | + | <br/> | |
| + | '''Example 3'''<br/> | ||
| + | <code><?xml version="1.0" encoding="UTF-8"?> <Invoice xmlns="urn:oasis:names:specification:ubl:schema:xsd:Invoice-2" xmlns:cbc="urn:oasis:names:specification:ubl:schema:xsd:CommonBasicComponents-2"> <cbc:UBLVersionID>2.0</cbc:UBLVersionID> <cbc:CustomizationID>1.0</cbc:CustomizationID> <cbc:ProfileID>ExactOnline</cbc:ProfileID> ... </Invoice></code><br/> | ||
| + | * root element will be ''Invoice'' | ||
| + | * namespace will be ''"urn:oasis:names:specification:ubl:schema:xsd:Invoice-2"'' | ||
| + | <br/>{{info|This is identical for UBL 2.0 and 2.1}}<br/> | ||
| + | * identifiers will be: | ||
| + | ** UBLVersionID | ||
| + | ** CustomizationID | ||
| + | ** ProfileID | ||
| − | =Define new XML Mapping in the application= | + | ==Define new XML Mapping in the application== |
| − | ==Identifying mapping types== | + | ===Identifying mapping types=== |
In the settings menu mapping types can be added and modified. | In the settings menu mapping types can be added and modified. | ||
| − | [[ | + | [[image:MappingTypeMenu.png|link=]] |
A mapping type is identified by the root node of the xml and the namespace of this root node. | A mapping type is identified by the root node of the xml and the namespace of this root node. | ||
| Line 42: | Line 47: | ||
When adding a mapping type, a name must be specified and an example xml must be uploaded. | When adding a mapping type, a name must be specified and an example xml must be uploaded. | ||
| − | [[ | + | [[image:EditMappingType1.png|link=]] |
The Root element and its namespace is read from the example xml file and can’t be changed. | The Root element and its namespace is read from the example xml file and can’t be changed. | ||
| Line 48: | Line 53: | ||
The tree structure of the xml file is shown. | The tree structure of the xml file is shown. | ||
| − | [[ | + | [[image:EditMappingType2.png|link=]] |
The application allows to remove certain unusable (for mapping) nodes , or to mark some nodes as identifying columns by clicking on the nodes. | The application allows to remove certain unusable (for mapping) nodes , or to mark some nodes as identifying columns by clicking on the nodes. | ||
| − | By clicking the [[ | + | By clicking the [[image:addIcon.png|link=]] icon, the xml (or another xml with same rootnode and namespace ) can be re-uploaded to add additional nodes. |
| − | ==Identify mappings== | + | ===Identify mappings=== |
| − | [[ | + | [[image:addMapping.png|link=]] |
Once mapping types are defined we can go along and define the actual mappings. | Once mapping types are defined we can go along and define the actual mappings. | ||
| − | A mapping can be added by clicking the [[ | + | A mapping can be added by clicking the [[image:addIcon.png|link=]] icon, edited by clicking the [[image:editIcon.png|link=]] and removed by clicking the [[image:removeIcon.png|link=]] icon. |
A mapping can be defined per : | A mapping can be defined per : | ||
| Line 69: | Line 74: | ||
If a mapping is defined specifically for a company (company of the mapping is not null) this mapping is preferred to the general mapping for all companies (company of the mapping is null). | If a mapping is defined specifically for a company (company of the mapping is not null) this mapping is preferred to the general mapping for all companies (company of the mapping is null). | ||
| − | [[ | + | [[image:editMapping1.png|link=]] |
The mapping name, document type and values for the identifying columns are mandatory to be able to save a mapping. | The mapping name, document type and values for the identifying columns are mandatory to be able to save a mapping. | ||
| Line 79: | Line 84: | ||
The partner field allows to map the supplier or customer based on field in the xml. If this field is filled out another additional tab ‘Partner Mappings’ is shown. | The partner field allows to map the supplier or customer based on field in the xml. If this field is filled out another additional tab ‘Partner Mappings’ is shown. | ||
| − | ===Header Mappings === | + | ====Header Mappings ==== |
| − | [[ | + | [[image:editHeaderMapping.png|link=]] |
When selecting the “Header Mappings” tab a list of all header fields will be shown. | When selecting the “Header Mappings” tab a list of all header fields will be shown. | ||
| − | For each header field a node can be selected by clicking the [[ | + | For each header field a node can be selected by clicking the [[image:listIcon.png|link=]] icon. If a node is selected the value of the header field will be filled out with the value of the node in the xml field. |
Note : not all header fields have to be mapped to a node. | Note : not all header fields have to be mapped to a node. | ||
| Line 90: | Line 95: | ||
Eventually a formatter can be added. This formatter will format the data in the Xml file in a specific way to fill out the header field. (example date formatter) | Eventually a formatter can be added. This formatter will format the data in the Xml file in a specific way to fill out the header field. (example date formatter) | ||
| − | ===Other Mappings=== | + | ====Other Mappings==== |
| − | [[ | + | [[image:editOtherMapping.png|link=]] |
The ‘other mappings’ tabs allows to specify the nodes in the Xml that contains : | The ‘other mappings’ tabs allows to specify the nodes in the Xml that contains : | ||
| Line 98: | Line 103: | ||
| − | ===Posting Line Mappings === | + | ====Posting Line Mappings ==== |
| − | [[ | + | [[image:editPostingLineMapping.png|link=]] |
When selecting the “Posting Line Mappings” tab a list of all posting line fields will be shown. | When selecting the “Posting Line Mappings” tab a list of all posting line fields will be shown. | ||
| − | For each field a node can be selected by clicking the [[ | + | For each field a node can be selected by clicking the [[image:listIcon.png|link=]] icon. If a node is selected the value of the posting line field will be filled out with the value of the node in the xml field. |
Note : not all fields have to be mapped to a node. | Note : not all fields have to be mapped to a node. | ||
| Line 109: | Line 114: | ||
Eventually a formatter can be added. This formatter will format the data in the Xml file in a specific way to fill out the header field. (example date formatter) | Eventually a formatter can be added. This formatter will format the data in the Xml file in a specific way to fill out the header field. (example date formatter) | ||
| − | === Partner Mappings === | + | ==== Partner Mappings ==== |
| − | [[ | + | [[image:editPartnerMapping.png|link=]] |
The partner mapping tab allows to identify the partner (customer or supplier) in the SCANPRO application by some identifying fields. | The partner mapping tab allows to identify the partner (customer or supplier) in the SCANPRO application by some identifying fields. | ||
Revision as of 12:56, 4 November 2016
Contents
1 Goal
To be able to support as much e-invoicing formats as possible, we developed a solution that enables the users to create a custom mapping of XML files.
2 Identify XML
To be able to import different XML types, you have to identify which kind of XML is used. There are different identifiers available:
- the name of the root element
- the namespace of the root element
| It is discouraged to work with empty namespaces. If two vendors would use empty namespaces and their root element would be the same, XML's will be confused. |
- values of certain elements
| These elements are fixed for a certain root element (and its namespace). |
2.1 Examples
Example 1
<?xml version="1.0" encoding="UTF-8"?> <Invoice> <amount></amount> ... </Invoice>
- root element will be Invoice
- empty namespace
- no other identifying elements
| This setup is strongly discouraged |
Example 2
<?xml version="1.0" encoding="UTF-8"?> <Invoice> <implementation>customer 1</implementation> <amount></amount> ... </Invoice>
- root element will be Invoice
- empty namespace
- implementation is an additional identifier for this root
Following XML defines its own mapping:
<?xml version="1.0" encoding="UTF-8"?> <Invoice> <implementation>customer 2</implementation> <amountPaid></amountPaid> ... </Invoice>
Example 3
<?xml version="1.0" encoding="UTF-8"?> <Invoice xmlns="urn:oasis:names:specification:ubl:schema:xsd:Invoice-2" xmlns:cbc="urn:oasis:names:specification:ubl:schema:xsd:CommonBasicComponents-2"> <cbc:UBLVersionID>2.0</cbc:UBLVersionID> <cbc:CustomizationID>1.0</cbc:CustomizationID> <cbc:ProfileID>ExactOnline</cbc:ProfileID> ... </Invoice>
- root element will be Invoice
- namespace will be "urn:oasis:names:specification:ubl:schema:xsd:Invoice-2"
| This is identical for UBL 2.0 and 2.1 |
- identifiers will be:
- UBLVersionID
- CustomizationID
- ProfileID
3 Define new XML Mapping in the application
3.1 Identifying mapping types
In the settings menu mapping types can be added and modified.
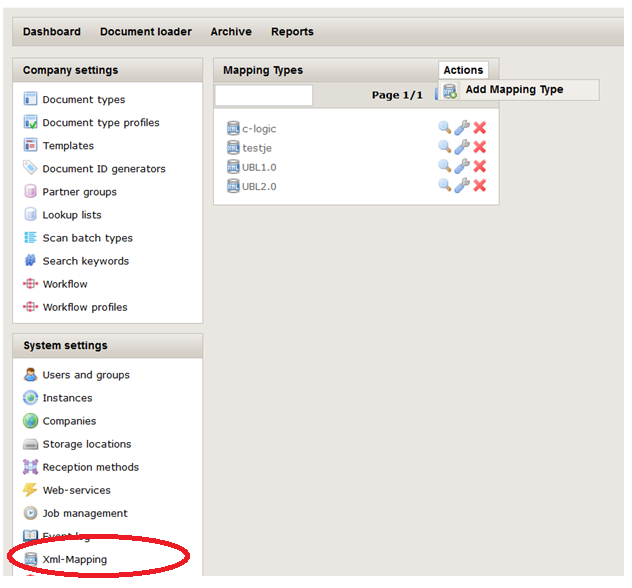
A mapping type is identified by the root node of the xml and the namespace of this root node.
When adding a mapping type, a name must be specified and an example xml must be uploaded.
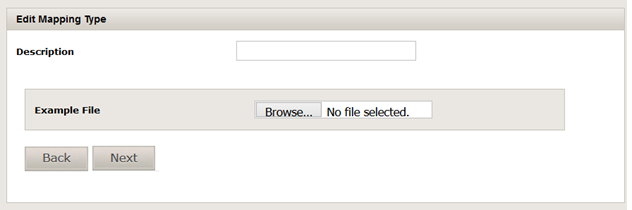
The Root element and its namespace is read from the example xml file and can’t be changed.
The tree structure of the xml file is shown.
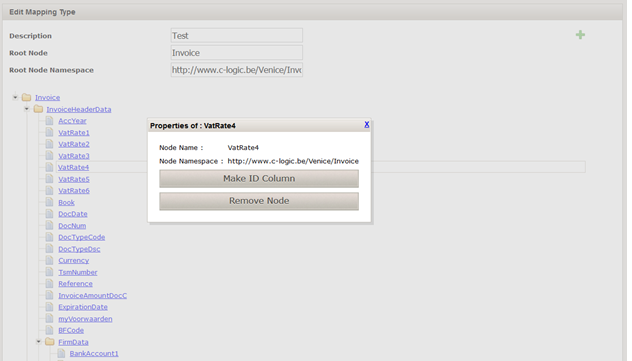
The application allows to remove certain unusable (for mapping) nodes , or to mark some nodes as identifying columns by clicking on the nodes.
By clicking the ![]() icon, the xml (or another xml with same rootnode and namespace ) can be re-uploaded to add additional nodes.
icon, the xml (or another xml with same rootnode and namespace ) can be re-uploaded to add additional nodes.
3.2 Identify mappings

Once mapping types are defined we can go along and define the actual mappings.
A mapping can be added by clicking the ![]() icon, edited by clicking the
icon, edited by clicking the ![]() and removed by clicking the
and removed by clicking the ![]() icon.
icon.
A mapping can be defined per :
- Document type
- Company. If the company is not filled out the mapping can apply to any company.
- Any possible combination of the identifying columns.
If a mapping is defined specifically for a company (company of the mapping is not null) this mapping is preferred to the general mapping for all companies (company of the mapping is null).
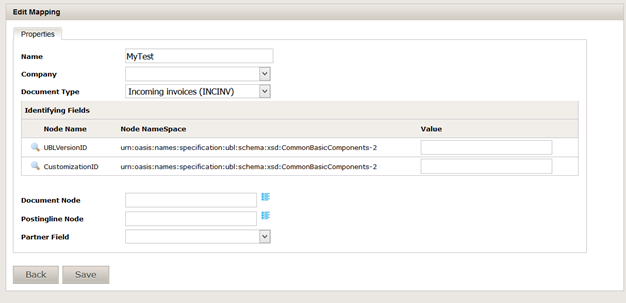
The mapping name, document type and values for the identifying columns are mandatory to be able to save a mapping.
When selecting the document node (this is the node in the xml tree that represents an invoice), 2 additional tabs ‘Header Mappings’ and ‘Other Mappings’ are shown.
When selecting the postingline node (this is the node in the xml representing the invoice lines), an additional tab ‘Posting Line Mappings’ is shown.
The partner field allows to map the supplier or customer based on field in the xml. If this field is filled out another additional tab ‘Partner Mappings’ is shown.
3.2.1 Header Mappings
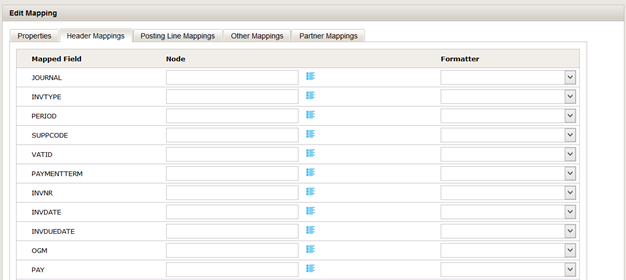
When selecting the “Header Mappings” tab a list of all header fields will be shown.
For each header field a node can be selected by clicking the ![]() icon. If a node is selected the value of the header field will be filled out with the value of the node in the xml field.
icon. If a node is selected the value of the header field will be filled out with the value of the node in the xml field.
Note : not all header fields have to be mapped to a node.
Eventually a formatter can be added. This formatter will format the data in the Xml file in a specific way to fill out the header field. (example date formatter)
3.2.2 Other Mappings

The ‘other mappings’ tabs allows to specify the nodes in the Xml that contains :
- The filename of the invoice image. This is used in case the invoice image is not embedded in the xml.
- The embedded invoice image. This is the base 64 encoded string of the invoice image.
3.2.3 Posting Line Mappings
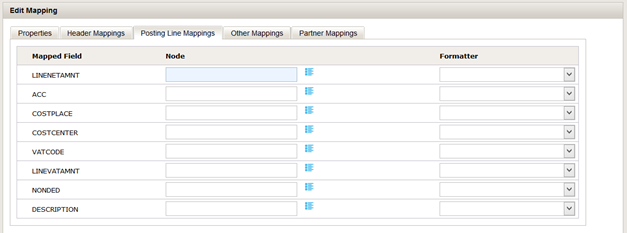
When selecting the “Posting Line Mappings” tab a list of all posting line fields will be shown.
For each field a node can be selected by clicking the ![]() icon. If a node is selected the value of the posting line field will be filled out with the value of the node in the xml field.
icon. If a node is selected the value of the posting line field will be filled out with the value of the node in the xml field.
Note : not all fields have to be mapped to a node.
Eventually a formatter can be added. This formatter will format the data in the Xml file in a specific way to fill out the header field. (example date formatter)
3.2.4 Partner Mappings
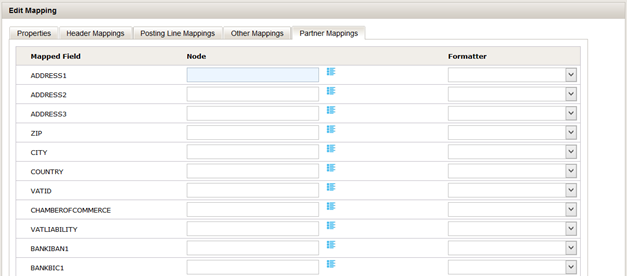
The partner mapping tab allows to identify the partner (customer or supplier) in the SCANPRO application by some identifying fields.
The screen shows all the fields defined in SCANPRO for a supplier/customer.
By selecting a node for a field the application will try to identify the supplier/customer based on that nodes’ value in the xml.
Example: when linking the VATID field to a node in the xml containing a VAT number. The application will look in the database for all partners with that VAT number.
If multiple fields are mapped to nodes. The application will look for all partners complying any of the rules.
If more than one partner is found, the partners are stored in the field options allowing the user to select the correct partner when viewing the archive.
If no partner is found the field values are saved in field proposals.
The rules will be rechecked every time the document is opened in the archive. So in case the correct partner is added between the upload and the opening of the document in the archive.
The partner can be completed by the system.