Difference between revisions of "User management"
m (Text replace - "ScanPRO" to "'''One Archive'''") |
(→Company upload) |
||
| (14 intermediate revisions by 2 users not shown) | |||
| Line 1: | Line 1: | ||
| − | '''Location: '''My account | + | <div style="font-size: 150%;">'''Location''': "My account"</div> |
| + | <br/><div style="font-size: 130%">[[image:email.png|link=]] '''If you would like to create an extra user, please fill in following form: [https://onearchive.wufoo.com/forms/q3oboyf01o40z6/ add new user form]'''</div> | ||
| + | <br/>[[image:my_account.png|link=]] | ||
| + | <br/><br/> | ||
| + | This page allows you to customize some of the behavior settings of 1Archive. The different options that are available:<br/> | ||
| + | <br/> | ||
| + | ==My account== | ||
| + | * '''Name''': allows you to change your name. | ||
| + | * '''E-mail''': allows you to change your e-mail address. | ||
| + | * '''User language''': allows you to define the default language which should be used for 1Archive. | ||
| + | * '''Default view''': allows you to select the page you find the most convenient to see when logging in. | ||
| + | <br/>{{Info|If you choose “Archive”, when logging on, it will reopen the subdivision you were on at closing.}}<br/> | ||
| + | * '''Default view limit''': allows you to define the limit of the number of documents you wish to see in your archive. | ||
| + | <br/>{{Note|3 months is preferable, this for performance reasons.}}<br/> | ||
| + | * '''Hierarchical person''': shows the person who is hierarchical above you and gets your reminders when you don't react in time. This is only shown when available. | ||
| + | * '''Button behavior''': allows you to define what behavior the action buttons should have. | ||
| + | ** ''Invoke button and close'': perform the action the button needs to do and close the current opened document. | ||
| + | ** ''Invoke button and open next document'': perform the action the button needs to do and open the next document. | ||
| + | <br/>{{Note|''Invoke button and open next document'' is preferable.}}<br/> | ||
| + | * '''Skip confirmations''': if checked, no extra confirmation will be asked when performing actions like booking, cancelling, ... | ||
| + | * '''Skip locked documents''': if checked, the documents indicated with the [[image:lock.png|link=]] "Document is locked by $USER" icon will be skipped while validating. | ||
| − | + | <br/>{{info|When the "Skip locked documents" setting is checked, you will not be able to open locked documents. If it isn't checked, you can still view the document but everything will be read-only.}}<br/> | |
| − | + | ==Accounts== | |
| + | * [[image:edit.png|link=]] '''"Edit account"''': allows you to change your username to login and password. | ||
| + | * [[image:remove.png|link=]] '''"Remove account"''': allows you to remove the login credentials. | ||
| + | <br/>{{warning|Caution: removing your account has the effect that you're not able to login anymore!}} | ||
| + | <br/> | ||
| − | + | ==Exact== | |
| − | + | To be able to synchronize data and book documents, your companies need to be linked to Exact Online. To be able to set this up, one of the users that has rights to the company needs to authorize and link the company to his/her authorization. | |
| + | ===Link Exact to your EIS account=== | ||
| + | If you're not authorized yet, you will see following screen: | ||
| − | + | <br/>[[image:not_authorized.png|link=]]<br/> | |
| + | <br/> | ||
| + | Click the "Authorize" button to link your EIS account to your Exact Online account. You will be redirected to Exact Online to enter your credentials and your verification code. If everything is correct, you will now see you're authorized with Exact Online: | ||
| + | <br/>[[image:authorized.png|link=]]<br/> | ||
| + | <br/> | ||
| + | ===Relink companies=== | ||
| + | When some of your companies have a broken link with Exact Online, this is indicated with a warning next to the "Relink companies" button. Clicking this button will give you a new page where you will see a list of companies.<br/> | ||
| + | The companies in this list are the ones you have linked to your EIS account, but don't have any link to Exact Online. This means they won't be able to synchronise and you won't be able to book documents for them. They need to be relinked in order to be able to synchronise and book again.<br/> | ||
| + | Check the box next to the ones you would like to relink to your authorisation and click the "Relink selected companies" button on top of the list. | ||
| − | + | <br/>{{warning|The relinkable companies are the ones that are available in the Exact Online account which you used for authenticating with EIS. If a company is not available in your Exact Online account, you will not be able to relink this one to your EIS account.}} | |
| − | |||
| − | |||
| + | <br/>[[image:relink_companies.png|link=]]<br/> | ||
| + | <br/> | ||
| − | {{ | + | ===Add new companies=== |
| + | <br/>{{warning|If you want to add dossiers to BilltoBox too, make sure you first do the 1Archive part. This way you already have the needed API key you will need to enter in BilltoBox.}}<br/> | ||
| + | Click the "Import new companies" button to import new companies. This button will lead you to a screen where you will see a list of all available companies for your user in Exact Online.<br/> | ||
| + | If you want to import all listed companies at once, click the "Import all companies" button on top of the list. If you don't want them all at once, you can select the ones you like by using the [[yes.png|link=]] "Import company" button next to the ones you would like to import.<br/> | ||
| + | When done, click the "Back" button. | ||
| − | + | <br/>{{info|This list will only show the companies which aren't already available in EIS.}}<br/> | |
| − | + | {{warning|It could take a while to completely synchronise your selected companies. Please be patient.}}<br/> | |
| + | <br/>[[image:import_new_companies.png|link=]]<br/> | ||
| + | <br/> | ||
| − | + | ==Company upload== | |
| + | As of 1Archive version 2021.2 it's possible to add your own companies via Excel upload. | ||
| − | {{Note|If you want to | + | {{info|Note that this is only applicable for environments which have this functionality activated.}}<br/> |
| + | |||
| + | In order to do this, you need an Excel file with all the companies you would like to import listed. To retrieve a template, please contact our support department at [mailto:onea-support@unifiedpost.com onea-support@unifiedpost.com].<br/> | ||
| + | <br/> | ||
| + | Once you have your Excel file, go to ''"My account"'' on top of the page. Scroll down until you see the ''"Company upload"'' block and click the ''"Choose file"'' button next to ''"Select Excel file"''.<br/> | ||
| + | <br/>[[image:company-upload.png|500px|link=]]<br/> | ||
| + | |||
| + | If you chose a file, the ''"Parse Excel file "'' button will become active:<br/> | ||
| + | <br/>[[image:company-upload-selected-file.png|500px|link=]]<br/> | ||
| + | |||
| + | Clicking the ''"Parse Excel file"'' button results in a new screen opening which shows you either an error message, or a list of companies out of your Excel file. If you uploaded an Excel file which is not empty and contains the correct fields for a company import, you should see a screen similar to this one:<br/> | ||
| + | <br/>[[image:company-upload-available-companies.png|300px|link=]]<br/> | ||
| + | |||
| + | This screen allows you to select the companies you want to import from your Excel file. Just select the ones you want to import, and the ''"Import selected companies"'' button will become available. | ||
| + | <br/>{{info|Note that if you want to update information of already imported companies, this can also be done here. Select the company which has updated info in the Excel file, and the update will be performed in 1Archive too.}} | ||
| + | <br/>[[image:company-upload-selected-companies.png|300px|link=]]<br/> | ||
| + | |||
| + | After clicking the ''"Import selected companies"'' button, you'll be redirected to again another page which is showing you the status of the import.<br/> | ||
| + | <br/>[[image:company-upload-success.png|500px|link=]]<br/> | ||
| + | |||
| + | If you would have selected an empty Excel file, or an invalid file (either another Excel file, or any other file) you will be presented with an error message when trying to parse the file.<br/> | ||
| + | <br/>[[image:company-upload-invalid.png|500px|link=]]<br/> | ||
| + | |||
| + | ==Nomadesk== | ||
| + | [[image:nomadesk_my_account.png|link=]]<br/> | ||
| + | <br/> | ||
| + | If you would like to see the files in your Nomadesk in 1Archive fill in following information: | ||
| + | * '''Username''': your Nomadesk username. | ||
| + | * '''Password''': your Nomadesk password. | ||
| + | * '''Name of the vault''': the vault you would like to view. | ||
| + | <br/>{{info|The list with vault names will automatically fill when entering a username and a password.}}<br/> | ||
| + | {{warning|Make sure you have a folder ''"Onea"'' in your selected vault, otherwise you won't see any files!}}<br/> | ||
| + | |||
| + | When all data is correctly entered, you will see your files in the ''"[[Nomadesk|Nomadesk]]"'' tab. | ||
| + | <br/> | ||
| + | |||
| + | ==Backup persons== | ||
| + | The [[image:add.png|link=]] "Add" button allows you to define a backup person. This person will be able to process the documents that have been assigned to you in the period of your absence. | ||
| + | |||
| + | <br/>{{Info|This is only useful for approvers.}} | ||
| + | |||
| + | ==Reminder settings== | ||
| + | * '''Type of "New document" notification''': the value for this parameter defines if you would like to receive e-mails regarding new documents or not. There are 3 different values to choose from: | ||
| + | **''Per each new document'': send an e-mail per new available document. | ||
| + | **''Summary'': send daily an e-mail with a summary of the different newly available documents. | ||
| + | **''Never'': never send an e-mail for newly available documents. | ||
| + | * '''Type of "Reminder" notification''': the value for this parameter defines if you would like to receive e-mails regarding outstanding, unhandled documents. There are 2 different values to choose from: | ||
| + | **''Summary'': send daily a summary of the different reminders. | ||
| + | **''Never'': never send reminder e-mails. | ||
| + | |||
| + | <br/>{{note|By default, reminders are sent. Only if you turn them off in the above setting, you don't receive them anymore.}} | ||
| + | |||
| + | ==Multiple user rights== | ||
| + | Whenever a user has multiple user rights (this occur whenever someone needs to be accountant and approver for example), there's a dropdown list located next to ''"My account"''. This will show all user rights you're having. To login as an approver, click on the approver user. To login as an accountant, click on the accountant user.<br/> | ||
| + | <br/>[[image:multiple-users.png|link=]]<br/> | ||
| + | |||
| + | <br/>{{info|Please [[Contact|contact]] us whenever this needs to be setup for you.}} | ||
Latest revision as of 16:01, 23 February 2021
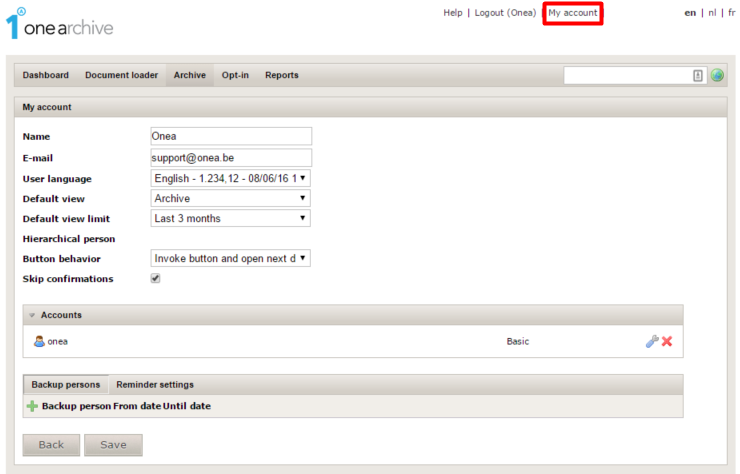
This page allows you to customize some of the behavior settings of 1Archive. The different options that are available:
Contents
1 My account
- Name: allows you to change your name.
- E-mail: allows you to change your e-mail address.
- User language: allows you to define the default language which should be used for 1Archive.
- Default view: allows you to select the page you find the most convenient to see when logging in.
| If you choose “Archive”, when logging on, it will reopen the subdivision you were on at closing. |
- Default view limit: allows you to define the limit of the number of documents you wish to see in your archive.
| 3 months is preferable, this for performance reasons. |
- Hierarchical person: shows the person who is hierarchical above you and gets your reminders when you don't react in time. This is only shown when available.
- Button behavior: allows you to define what behavior the action buttons should have.
- Invoke button and close: perform the action the button needs to do and close the current opened document.
- Invoke button and open next document: perform the action the button needs to do and open the next document.
| Invoke button and open next document is preferable. |
- Skip confirmations: if checked, no extra confirmation will be asked when performing actions like booking, cancelling, ...
- Skip locked documents: if checked, the documents indicated with the
 "Document is locked by $USER" icon will be skipped while validating.
| When the "Skip locked documents" setting is checked, you will not be able to open locked documents. If it isn't checked, you can still view the document but everything will be read-only. |
2 Accounts
-
 "Edit account": allows you to change your username to login and password.
 -
 "Remove account": allows you to remove the login credentials.
| Caution: removing your account has the effect that you're not able to login anymore! |
3 Exact
To be able to synchronize data and book documents, your companies need to be linked to Exact Online. To be able to set this up, one of the users that has rights to the company needs to authorize and link the company to his/her authorization.
3.1 Link Exact to your EIS account
If you're not authorized yet, you will see following screen:

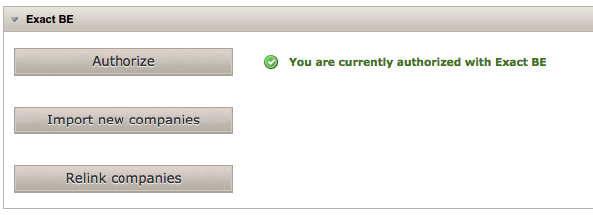
Click the "Authorize" button to link your EIS account to your Exact Online account. You will be redirected to Exact Online to enter your credentials and your verification code. If everything is correct, you will now see you're authorized with Exact Online:
3.2 Relink companies
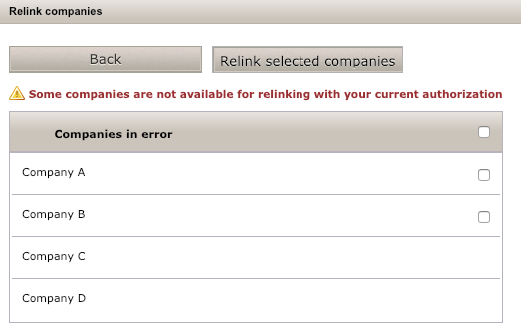
When some of your companies have a broken link with Exact Online, this is indicated with a warning next to the "Relink companies" button. Clicking this button will give you a new page where you will see a list of companies.
The companies in this list are the ones you have linked to your EIS account, but don't have any link to Exact Online. This means they won't be able to synchronise and you won't be able to book documents for them. They need to be relinked in order to be able to synchronise and book again.
Check the box next to the ones you would like to relink to your authorisation and click the "Relink selected companies" button on top of the list.
| The relinkable companies are the ones that are available in the Exact Online account which you used for authenticating with EIS. If a company is not available in your Exact Online account, you will not be able to relink this one to your EIS account. |
3.3 Add new companies
| If you want to add dossiers to BilltoBox too, make sure you first do the 1Archive part. This way you already have the needed API key you will need to enter in BilltoBox. |
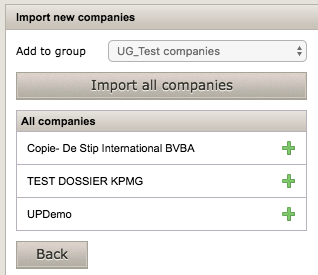
Click the "Import new companies" button to import new companies. This button will lead you to a screen where you will see a list of all available companies for your user in Exact Online.
If you want to import all listed companies at once, click the "Import all companies" button on top of the list. If you don't want them all at once, you can select the ones you like by using the link= "Import company" button next to the ones you would like to import.
When done, click the "Back" button.
| This list will only show the companies which aren't already available in EIS. |
| It could take a while to completely synchronise your selected companies. Please be patient. |
4 Company upload
As of 1Archive version 2021.2 it's possible to add your own companies via Excel upload.
| Note that this is only applicable for environments which have this functionality activated. |
In order to do this, you need an Excel file with all the companies you would like to import listed. To retrieve a template, please contact our support department at onea-support@unifiedpost.com.
Once you have your Excel file, go to "My account" on top of the page. Scroll down until you see the "Company upload" block and click the "Choose file" button next to "Select Excel file".

If you chose a file, the "Parse Excel file " button will become active:

Clicking the "Parse Excel file" button results in a new screen opening which shows you either an error message, or a list of companies out of your Excel file. If you uploaded an Excel file which is not empty and contains the correct fields for a company import, you should see a screen similar to this one:
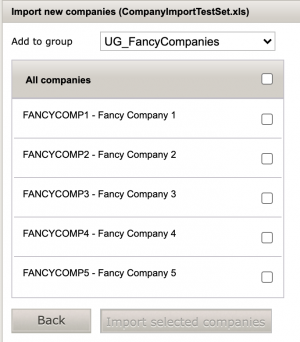
This screen allows you to select the companies you want to import from your Excel file. Just select the ones you want to import, and the "Import selected companies" button will become available.
| Note that if you want to update information of already imported companies, this can also be done here. Select the company which has updated info in the Excel file, and the update will be performed in 1Archive too. |
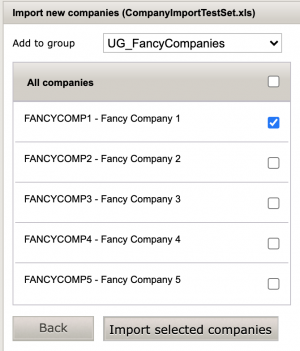
After clicking the "Import selected companies" button, you'll be redirected to again another page which is showing you the status of the import.

If you would have selected an empty Excel file, or an invalid file (either another Excel file, or any other file) you will be presented with an error message when trying to parse the file.

5 Nomadesk

If you would like to see the files in your Nomadesk in 1Archive fill in following information:
- Username: your Nomadesk username.
- Password: your Nomadesk password.
- Name of the vault: the vault you would like to view.
| The list with vault names will automatically fill when entering a username and a password. |
| Make sure you have a folder "Onea" in your selected vault, otherwise you won't see any files! |
When all data is correctly entered, you will see your files in the "Nomadesk" tab.
6 Backup persons
The ![]() "Add" button allows you to define a backup person. This person will be able to process the documents that have been assigned to you in the period of your absence.
"Add" button allows you to define a backup person. This person will be able to process the documents that have been assigned to you in the period of your absence.
| This is only useful for approvers. |
7 Reminder settings
- Type of "New document" notification: the value for this parameter defines if you would like to receive e-mails regarding new documents or not. There are 3 different values to choose from:
- Per each new document: send an e-mail per new available document.
- Summary: send daily an e-mail with a summary of the different newly available documents.
- Never: never send an e-mail for newly available documents.
- Type of "Reminder" notification: the value for this parameter defines if you would like to receive e-mails regarding outstanding, unhandled documents. There are 2 different values to choose from:
- Summary: send daily a summary of the different reminders.
- Never: never send reminder e-mails.
| By default, reminders are sent. Only if you turn them off in the above setting, you don't receive them anymore. |
8 Multiple user rights
Whenever a user has multiple user rights (this occur whenever someone needs to be accountant and approver for example), there's a dropdown list located next to "My account". This will show all user rights you're having. To login as an approver, click on the approver user. To login as an accountant, click on the accountant user.

| Please contact us whenever this needs to be setup for you. |