Difference between revisions of "Performing support tasks"
(→Filter on validation status) |
|||
| (37 intermediate revisions by 2 users not shown) | |||
| Line 1: | Line 1: | ||
==Searching for invoices== | ==Searching for invoices== | ||
| + | In the 1Archive system, any user is allowed to search for documents by using the filter above the archivelist. | ||
| + | <br/>{{note|It's only possible to search for documents when you are in the archive.}}<br/> | ||
| − | + | Next to the selected document type, there are two icons available for searching documents: | |
| − | + | * [[image:filterClose.png|link=]] '''"Open filter"''': opens the filter screen. | |
| + | * [[image:filterLoad.png|link=]] '''"Open favorite filter"''': opens a screen with your favorite filters in it. | ||
| − | + | ===Using the filter=== | |
| + | When opening the filter, following screen appears:<br/> | ||
| + | <br/> | ||
| + | [[image:filter_screen.png|link=]]<br/> | ||
| + | <br/> | ||
| + | {{note|Depending upon your environment, the selected field could be different.}}<br/> | ||
| − | + | Following fields are available: | |
| − | + | * '''Field''': choose the field on which you would like to filter the documents. | |
| − | * | + | <br/>{{note|The available fields are all header-, technical- and posting line fields from your environment. See ''[[Validating_invoices|"Validating invoices"]]'' for all available fields.}}<br/> |
| − | + | * '''Operator''': choose the operator on which you would like to filter. Possible values are: | |
| − | + | ** ''Include'': the field includes the value(s) provided. | |
| − | + | ** ''Exclude'': the field excludes the value(s) provided. | |
| − | + | ** ''Empty'': choose this in case you want to check on an empty value. | |
| − | * | + | * '''From''' and '''To''': the value of the field has to lie in between these two values. |
| − | ** | + | <br/>{{note|Certain fields only have the possibility to enter a <u>'''From'''</u> value.}}<br/> |
| − | ** | + | {{note|Based on the type of the selected field, it's possible to either type in text, select from a [[image:listPicker.png|link=]] "List" or select a [[image:date.png|link=]] "Date".}}<br/> |
| − | ** | + | {{info|Tip: it is possible to search for multiple values inside one filter box by using a semicolon (;). But this only works for text fields, not for numeric, date and lookuplist fields!<br/> |
| − | * | + | '''Example''': enter 2017032101;2017032102 to search for invoices with invoice number 2017032101 and 2017032102.}}<br/> |
| + | {{info|If you would like to filter on one particular value, add this in the <u>'''From'''</u> field}}<br/> | ||
| + | Adding an extra line to filter on is done via the [[image:add.png|link=]] "Add" button in the left upper corner of the filter screen.<br/> | ||
| + | Removing a line is done via the [[image:remove.png|link=]] "Remove" button in front of each line.<br/> | ||
| + | <br/> | ||
| + | At the bottom of the filter screen, there are four different buttons available: | ||
| + | * [[image:filterClose.png|link=]] '''"Close filter"''': hides the filter screen. | ||
| + | <br/>{{warning|Note that clicking [[image:filterClose.png|link=]] "Close filter" does not clear or apply the current filter.}}<br/> | ||
| + | {{note|When a filter is closed, it can be reopened easily by clicking the [[image:filterClose.png|link=]] "Open filter" button next to the document type.}}<br/> | ||
| + | * [[image:filterRemove.png|link=]] '''"Clear filter"''': remove all applied filters. | ||
| + | * [[image:filterApply.png|link=]] '''"Apply filter"''': applies the filter on the list of documents. | ||
| + | <br/>{{note|Note that the filter icon next to the document type will color red [[image:filterActive.png|link=]] to indicate that a filter is applied.}}<br/> | ||
| + | * [[image:filterSave.png|link=]] '''"Save filter"''': save a filter in your favorite filters. | ||
| + | <br/>{{info|Clicking this button results in the appearance of a pop-up screen where you have to name the filter.<br/> | ||
| + | [[image:save_filter.png|link=]]}} | ||
| − | |||
| − | + | ===Using favorite filters=== | |
| − | : | + | When opening your favorite filters, following screen appears:<br/> |
| − | + | <br/> | |
| − | + | [[image:favorite_filter_with_values.png|link=]]<br/> | |
| − | + | <br/> | |
| − | + | Selecting a filter to apply on the list of documents can be done by clicking the name of the filter.<br/> | |
| − | + | Removing a filter from your favorites can be done by using the [[image:remove.png|link=]] "Remove" button.<br/> | |
| + | <br/> | ||
| + | You can search for a filter using the textbox on top of the screen. Type a value and click ''"Apply filter"'' to search. Removing your search can be done by clicking the ''"Clear"'' button.<br/> | ||
| + | <br/> | ||
=== Filter on validation status === | === Filter on validation status === | ||
| − | + | Something worth mentioning is the ability to filter on validation status.<br/> | |
| − | + | <br/> | |
| − | + | [[image:Filter.png|link=]]<br/> | |
| − | [[image:Filter.png|link=]] | + | <br/> |
| − | + | Values to filter on are: | |
| − | + | * '''In progress''': the document still needs to be validated in the 1Archive system. | |
| − | ''In progress'': | + | * '''Valid''': the document is completely valid and contains no red or yellow fields. |
| − | + | * '''Invalid''': the document is invalid and contains red or yellow fields. | |
| − | ''Valid'': document is valid and no | ||
| − | |||
| − | ''Invalid'': document is invalid and contains red or yellow fields | ||
==Using wildcards== | ==Using wildcards== | ||
| + | In order to facilitate your search, you can make use of wildcards. There are two wildcards available: | ||
| + | * '''*''' | ||
| + | * '''%''' | ||
| + | <br/> | ||
| + | Both wildcards work as follows: | ||
| + | * '''*text''' or '''%text''': searches for all values ending with value "text". | ||
| + | * '''text*''' or '''text%''': searches for all values beginning with value "text". | ||
| + | * '''te*xt''' or '''te%xt''': searches for all values beginning with "te" and ending with "xt". | ||
| − | + | <br/>{{info|If you just type "text", the search will be based on "text*".}}<br/> | |
| − | + | {{warning|Searching for values in 1Archive is not case sensitive.}}<br/> | |
| − | + | {{warning|Using these wildcards is only possible in search dialogs. For example: the search dialog for suppliers in the document view.}}<br/> | |
| − | |||
| − | |||
| − | |||
| − | |||
| − | {{ | ||
| − | |||
| − | |||
| − | |||
| − | |||
| − | |||
| − | |||
| − | |||
| − | |||
| − | |||
| − | |||
| − | |||
| − | |||
| − | |||
| − | |||
| − | |||
| − | |||
| − | |||
| − | |||
| − | |||
| − | |||
| − | |||
| − | |||
| − | |||
| − | |||
| − | |||
| − | |||
| − | |||
| − | |||
| − | {{ | ||
| − | |||
| − | |||
| − | |||
| − | |||
| − | |||
| − | |||
| − | |||
| − | |||
| − | |||
| − | |||
| − | |||
| − | |||
| − | |||
| − | |||
| − | |||
| − | |||
| − | |||
| − | |||
| − | |||
| − | |||
| − | |||
| − | |||
| − | |||
| − | {{ | ||
| − | |||
| − | |||
| − | |||
| − | |||
| − | |||
| − | |||
| − | |||
| − | |||
| − | |||
| − | |||
| − | |||
| − | |||
| − | |||
| − | |||
| − | |||
| − | |||
| − | |||
| − | |||
| − | |||
| − | |||
| − | |||
| − | |||
| − | |||
| − | |||
| − | |||
| − | |||
| − | |||
| − | |||
| − | |||
| − | |||
| − | |||
| − | |||
| − | |||
| − | |||
| − | |||
| − | |||
| − | |||
| − | |||
| − | |||
| − | |||
| − | |||
| − | |||
| − | |||
| − | |||
| − | |||
| − | |||
| − | |||
| − | |||
| − | |||
| − | |||
| − | |||
| + | ==Exporting documents to Excel== | ||
| + | From the archive, it's possible to export the values of the document fields into Excel.<br/> | ||
| + | <br/> | ||
| + | In the archivelist, select the documents you would like to export by checking the checkboxes [[image:unselected.png|link=]] in front of the documents. Documents are selected when the checkboxes looks like this: [[image:selected.png|link=]].<br/> | ||
| + | Click on the [[image:pageXls.png|link=]] "Export to Excel" button to export the values of the document fields.<br/> | ||
| + | When clicking this button, you see following screen above the archivelist:<br/> | ||
| + | <br/> | ||
| + | [[image:export_excel.png|link=]]<br/> | ||
| + | <br/> | ||
| + | This screen allows you to select the fields to be exported. Following selections are available: | ||
| + | * '''Export all header fields''': | ||
| + | ** if you check the checkbox, then all available header fields will be exported | ||
| + | ** if you don't check the checkbox, then only the fields which are available in the archivelist will be exported | ||
| + | * '''Include lines''': if you check this checkbox, you have the possibility to select the lines which you would like to have in the export. Possible values are: | ||
| + | ** ''Posting line fields'': include all fields of the posting lines. | ||
| + | ** ''Detail line fields'': include all fields of the detail lines. | ||
| + | <br/>{{warning|Detail line fields are only available in the VIS environment!}}<br/> | ||
| + | {{info|In the Excel export, the header data will be repeated in case multiple posting lines will be exported. For example: when having a document with 2 posting lines, the Excel file will contain a similar header data row for each specific posting line.}}<br/> | ||
| + | Click the '''"Export to Excel"''' button in order to create the Excel file. This will be downloaded to your file system. | ||
| + | <br/>{{info|The export to Excel functionality has a limited number of documents that can be exported:<br/> | ||
| + | * EIS: 1000 documents | ||
| + | * OIS: 1000 documents | ||
| + | * VIS: 1000 documents | ||
| + | * Connected: 5000 documents | ||
| + | * MIS: 1000 documents}}<br/> | ||
| − | + | ==Exporting documents to PDF== | |
| − | + | From the archive, it's possible to export documents to PDF.<br/> | |
| − | + | Select the documents you would like to export by using the checkboxes [[image:unselected.png|link=]] in front of them. Documents are selected when the checkboxes look like this: [[image:selected.png|link=]].<br/> | |
| − | + | Click on the [[image:pagePdf.png|link=]] "Export to PDF" button to export the documents. | |
| − | + | <br/>{{info|All images, including the attachments, will be exported.}}<br/> | |
| − | + | {{warning|Only exportable attachments will be included!}}<br/> | |
| − | + | {{info|For each document, a bookmark will be created in the PDF file. This bookmark is based on the ID the document has in 1Archive.}}<br/> | |
| − | + | <br/>{{info|The export to PDF functionality has a limited number of documents that can be exported:<br/> | |
| − | + | * EIS: 100 documents | |
| − | + | * OIS: 100 documents | |
| − | + | * VIS: 100 documents | |
| − | + | * Connected: 100 documents | |
| − | + | * MIS: 100 documents}}<br/> | |
| − | |||
| − | |||
| − | |||
| − | |||
| − | |||
| − | ** | ||
| − | * | ||
| − | * | ||
| − | * | ||
| + | ==Exporting documents to XML== | ||
| + | From the archive, it's possible to export documents to an XML file.<br/> | ||
| + | Select the documents you would like to export using the checkboxes [[image:unselected.png|link=]] in front of them. Documents are selected when the checkboxes look like this: [[image:selected.png|link=]].<br/> | ||
| + | Click the [[image:PageXML.png|link=]] "Export to XML" button to export the documents.<br/> | ||
| − | + | <br/>{{info|The exported XML files will be in the 1Archive transfer format.}}<br/> | |
| − | ' | + | ==Exporting documents to Zip== |
| + | From the archive, it's possible to export documents to a Zip-file.<br/> | ||
| + | Select the documents you would like to export using the checkboxes [[image:unselected.png|link=]] in front of them. Documents are selected when the checkboxes look like this: [[image:selected.png|link=]].<br/> | ||
| + | Click the [[image:zip.png|link=]] "Export to Zip" button to export the documents.<br/> | ||
| + | <br/>{{info|The Zip-file contains a folder for each document you selected with all exportable images in it.}}<br/> | ||
| + | <br/>{{info|The export to Zip functionality has a limited number of documents that can be exported:<br/> | ||
| + | * EIS: 100 documents | ||
| + | * OIS: 100 documents | ||
| + | * VIS: 1000 documents | ||
| + | * Connected: 100 documents | ||
| + | * MIS: 100 documents}}<br/> | ||
| − | ' | + | ==Exporting documents to UBL== |
| + | From the archive, it's possible to export documents to UBL.<br/> | ||
| + | Select the documents you would like to export using the checkboxes [[image:unselected.png|link=]] in front of them. Documents are selected when the checkboxes look like this: [[image:selected.png|link=]].<br/> | ||
| + | Click the [[image:PageXML.png|link=]] "Export to UBL" button to export the documents.<br/> | ||
| + | <br/>{{info|Clicking this button will result in a Zip-file being downloaded to your system. This Zip-file contains an UBL invoice per exported document.}}<br/> | ||
| − | + | ==Mail as PDF== | |
| − | * | + | When in the archive, the left sidebar shows a [[image:pagePdf.png|link=]] "Mail as PDF" button. Clicking this button results in following screen that appears:<br/> |
| − | * | + | <br/> |
| + | [[image:mail_as_pdf.png|link=]]<br/> | ||
| + | <br/> | ||
| + | Following fields are available: | ||
| + | * '''E-mail address''': provide the e-mail address you wish to send the documents to. Default value will be the e-mail address of the currently logged in user. | ||
| + | * '''From''' and '''To''': provide the dates between which the voucher dates of the documents you would like to send are. | ||
| + | Click "Ok" to submit the data and send a merged PDF-file with all documents with voucher dates between the "From" and "To" date. | ||
Latest revision as of 11:53, 10 July 2018
Contents
1 Searching for invoices
In the 1Archive system, any user is allowed to search for documents by using the filter above the archivelist.
| It's only possible to search for documents when you are in the archive. |
Next to the selected document type, there are two icons available for searching documents:
-
 "Open filter": opens the filter screen.
 -
 "Open favorite filter": opens a screen with your favorite filters in it.
1.1 Using the filter
When opening the filter, following screen appears:

| Depending upon your environment, the selected field could be different. |
Following fields are available:
- Field: choose the field on which you would like to filter the documents.
| The available fields are all header-, technical- and posting line fields from your environment. See "Validating invoices" for all available fields. |
- Operator: choose the operator on which you would like to filter. Possible values are:
- Include: the field includes the value(s) provided.
- Exclude: the field excludes the value(s) provided.
- Empty: choose this in case you want to check on an empty value.
- From and To: the value of the field has to lie in between these two values.
| Certain fields only have the possibility to enter a From value. |
| Based on the type of the selected field, it's possible to either type in text, select from a |
| Tip: it is possible to search for multiple values inside one filter box by using a semicolon (;). But this only works for text fields, not for numeric, date and lookuplist fields! Example: enter 2017032101;2017032102 to search for invoices with invoice number 2017032101 and 2017032102. |
| If you would like to filter on one particular value, add this in the From field |
Adding an extra line to filter on is done via the ![]() "Add" button in the left upper corner of the filter screen.
"Add" button in the left upper corner of the filter screen.
Removing a line is done via the ![]() "Remove" button in front of each line.
"Remove" button in front of each line.
At the bottom of the filter screen, there are four different buttons available:
- "Close filter": hides the filter screen.
| Note that clicking |
| When a filter is closed, it can be reopened easily by clicking the |
-
 "Clear filter": remove all applied filters.
 -
 "Apply filter": applies the filter on the list of documents.
| Note that the filter icon next to the document type will color red |
-
 "Save filter": save a filter in your favorite filters.
Clicking this button results in the appearance of a pop-up screen where you have to name the filter.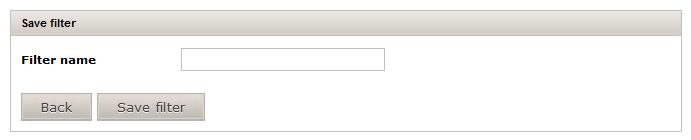 |
1.2 Using favorite filters
When opening your favorite filters, following screen appears:
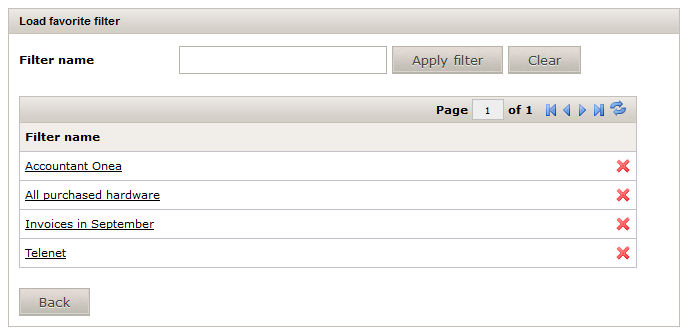
Selecting a filter to apply on the list of documents can be done by clicking the name of the filter.
Removing a filter from your favorites can be done by using the ![]() "Remove" button.
"Remove" button.
You can search for a filter using the textbox on top of the screen. Type a value and click "Apply filter" to search. Removing your search can be done by clicking the "Clear" button.
1.3 Filter on validation status
Something worth mentioning is the ability to filter on validation status.

Values to filter on are:
- In progress: the document still needs to be validated in the 1Archive system.
- Valid: the document is completely valid and contains no red or yellow fields.
- Invalid: the document is invalid and contains red or yellow fields.
2 Using wildcards
In order to facilitate your search, you can make use of wildcards. There are two wildcards available:
- *
- %
Both wildcards work as follows:
- *text or %text: searches for all values ending with value "text".
- text* or text%: searches for all values beginning with value "text".
- te*xt or te%xt: searches for all values beginning with "te" and ending with "xt".
| If you just type "text", the search will be based on "text*". |
| Searching for values in 1Archive is not case sensitive. |
| Using these wildcards is only possible in search dialogs. For example: the search dialog for suppliers in the document view. |
3 Exporting documents to Excel
From the archive, it's possible to export the values of the document fields into Excel.
In the archivelist, select the documents you would like to export by checking the checkboxes ![]() in front of the documents. Documents are selected when the checkboxes looks like this:
in front of the documents. Documents are selected when the checkboxes looks like this: ![]() .
.
Click on the ![]() "Export to Excel" button to export the values of the document fields.
"Export to Excel" button to export the values of the document fields.
When clicking this button, you see following screen above the archivelist:
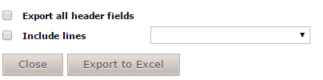
This screen allows you to select the fields to be exported. Following selections are available:
- Export all header fields:
- if you check the checkbox, then all available header fields will be exported
- if you don't check the checkbox, then only the fields which are available in the archivelist will be exported
- Include lines: if you check this checkbox, you have the possibility to select the lines which you would like to have in the export. Possible values are:
- Posting line fields: include all fields of the posting lines.
- Detail line fields: include all fields of the detail lines.
| Detail line fields are only available in the VIS environment! |
| In the Excel export, the header data will be repeated in case multiple posting lines will be exported. For example: when having a document with 2 posting lines, the Excel file will contain a similar header data row for each specific posting line. |
Click the "Export to Excel" button in order to create the Excel file. This will be downloaded to your file system.
The export to Excel functionality has a limited number of documents that can be exported:
|
4 Exporting documents to PDF
From the archive, it's possible to export documents to PDF.
Select the documents you would like to export by using the checkboxes ![]() in front of them. Documents are selected when the checkboxes look like this:
in front of them. Documents are selected when the checkboxes look like this: ![]() .
.
Click on the ![]() "Export to PDF" button to export the documents.
"Export to PDF" button to export the documents.
| All images, including the attachments, will be exported. |
| Only exportable attachments will be included! |
| For each document, a bookmark will be created in the PDF file. This bookmark is based on the ID the document has in 1Archive. |
The export to PDF functionality has a limited number of documents that can be exported:
|
5 Exporting documents to XML
From the archive, it's possible to export documents to an XML file.
Select the documents you would like to export using the checkboxes ![]() in front of them. Documents are selected when the checkboxes look like this:
in front of them. Documents are selected when the checkboxes look like this: ![]() .
.
Click the ![]() "Export to XML" button to export the documents.
"Export to XML" button to export the documents.
| The exported XML files will be in the 1Archive transfer format. |
6 Exporting documents to Zip
From the archive, it's possible to export documents to a Zip-file.
Select the documents you would like to export using the checkboxes ![]() in front of them. Documents are selected when the checkboxes look like this:
in front of them. Documents are selected when the checkboxes look like this: ![]() .
.
Click the ![]() "Export to Zip" button to export the documents.
"Export to Zip" button to export the documents.
| The Zip-file contains a folder for each document you selected with all exportable images in it. |
The export to Zip functionality has a limited number of documents that can be exported:
|
7 Exporting documents to UBL
From the archive, it's possible to export documents to UBL.
Select the documents you would like to export using the checkboxes ![]() in front of them. Documents are selected when the checkboxes look like this:
in front of them. Documents are selected when the checkboxes look like this: ![]() .
.
Click the ![]() "Export to UBL" button to export the documents.
"Export to UBL" button to export the documents.
| Clicking this button will result in a Zip-file being downloaded to your system. This Zip-file contains an UBL invoice per exported document. |
8 Mail as PDF
When in the archive, the left sidebar shows a ![]() "Mail as PDF" button. Clicking this button results in following screen that appears:
"Mail as PDF" button. Clicking this button results in following screen that appears:
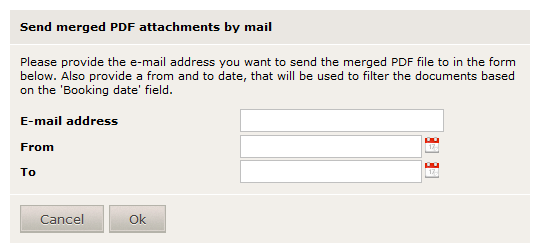
Following fields are available:
- E-mail address: provide the e-mail address you wish to send the documents to. Default value will be the e-mail address of the currently logged in user.
- From and To: provide the dates between which the voucher dates of the documents you would like to send are.
Click "Ok" to submit the data and send a merged PDF-file with all documents with voucher dates between the "From" and "To" date.