Difference between revisions of "Capturing invoice data"
| Line 30: | Line 30: | ||
| − | {{Note|You have always to divide the invoices depending the journal.}} | + | {{Note|You have always to divide the invoices depending on the journal.}} |
Revision as of 11:00, 21 November 2013
Invoice images can be captured by web scanning or by mail import.
Invoice image and data can be captured by XML import.
Contents
1 Capturing paper invoices by web scanning
Invoice images are entered into the system upon arrival through paper web scanning or file import.
The process of web scanning contains following steps:
- Batch preparation
- Batch creation
- Capturing the images by scanning or file import (scan application)
- Validation of the separation
- Release to the recognition server
1.1 Batch preparation for paper invoices
Before scanning the invoices, the scan batches have to be prepared:
- Remove all the staples of the invoices
- No stamps or post-it on the invoices
- Eliminate publicity
Invoices can be separated by putting a separator sheet between each invoice or by indicating the number of pages per stack of invoices.
- You can print these separator sheets by clicking in the Actions menu of the web scanning.
- The page indicator can be found in the scan application.
Different stacks can be made, depending on the batch fields.
| You have always to divide the invoices depending on the journal. |
Best practice: Make following batches
- Separate multiple pages and single pages.
- Scan multiple page invoices with separator sheet.
- Scan single page invoices using the “page indicator”.
- Divide invoices depending on journal.
- Stack invoices and credit notes apart (optional).
- Stack invoices of same period together (optional).
- Approximately 20-30 documents per batch.
1.1.1 Scan batch view
Location: Web scanning
At the right top of the web scan menu, you’ll find the menu “Actions”. In this menu you can create a batch or print the separation sheet.
In the main screen you’ll find a list of all the batches for your user for the selected company that aren’t processed yet.
The list shows you following details of the batches:
- Batch name: standard date and time
- Company: company for which you are scanning
- Batch type
- Incoming invoices
- Outgoing invoices
- Status: These are the possible statuses your scan batch can have.
- New: batch has just been created.
- Scanning: scan application is running.
- Received: server received the scan batch.
- Ready for transformation: batch is ready to be processed by the OCR server.
- Transformation: batch is being processed by the OCR server (recognition).
- Import error: error while importing the batch in the OCR server.
- Transformation error: something went wrong during the OCR server.
- Finished: scan batch is not visible anymore, documents are ready to be validated in ScanPro
In case of import or transformation error, please contact our helpdesk.
Next to the “Actions” menu you can find information on how many scan batches (pages) are available in the list.
Use following icons to move around:
-
 (First page) go to the first page of the list.
 -
 (Previous page) go to the previous page.
 -
 (Last page) go to the last page of the list.
 -
 (Next page) go to the next page.
![]() (reload) is used for refreshing the screen.
(reload) is used for refreshing the screen.
- Note: You can’t continue a web scan batch on another PC. Images are local stored on the PC before sending the batch to the server. So you have to finish your batch on the same PC.
1.2 Batch creation
Location: Web scanning
Make sure you are working in the correct company for which you are scanning the invoices.
To create a scan batch click in the right corner on “Actions” and thereafter on “Add scanning batch”.
- Select the batch type (Incoming invoice / Outgoing invoice).
- You can define a batch name, as default value the date and time is proposed.
- Fill in the batch fields, these fields will be prefill data in the validation screen.
- Invoice type: Invoice will be proposed but can be changed to Credit note by clicking on
 or by typing Credit note.
 - Journal: You can select the journal by clicking on or by typing the value. By default, the default journal as set is proposed. If there is only one journal defined, this journal will also be proposed as default journal.
- Note: if batch type is “incoming”: then you can only choose purchase journals. If batch type is “outgoing”: then you can only choose sales journals.
- Year: the default year proposed is the current year minus 20 days. If this year is not open, the youngest year will be proposed. You can change the year by clicking on and selecting the year or by typing the value
- Fiscal period: earliest active period will be proposed as default. You can change the period by clicking on and selecting the period or by typing the value.
- Note: period must be in the selected year
- Vat period: earliest active period will be proposed. You can change the period by clicking on and selecting the period or by typing.
- Note: period must be in the selected year.
- Invoice type: Invoice will be proposed but can be changed to Credit note by clicking on
Only the “journal” batch field is required, other fields can be left blank.
There is always a check if the period is open.
Press the save button to create the scan batch and click on ![]() (scan), next to your scan batch, to open the scan application.
(scan), next to your scan batch, to open the scan application.
You can use ![]() (edit scanning batch) to edit the batch fields or
(edit scanning batch) to edit the batch fields or ![]() (Remove scanning batch) to delete the scan batch.
(Remove scanning batch) to delete the scan batch.
1.3 Capturing the images by scanning or file import (scan application)
There are two possibilities to import images in the scan application:
- 1) Scanning :
- Put your papers on the scanner and click on
 (Scan) to start the scanning.
 - Following screen will pop up.
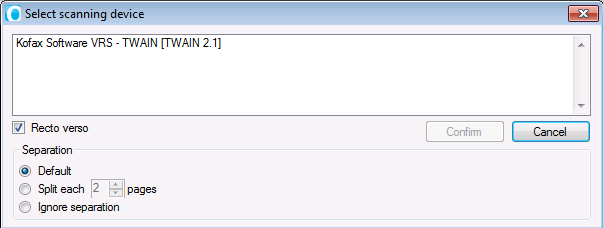
- All installed scanners will be displayed in this popup screen.
- If you have a VRS scanner, select always this type of scanner as it guarantees better scanning results.
- Ignore separation: If you don’t want to separate.
- Recto/verso: if you want to scan both sides of the document.
- Blank pages are deleted when scanning with VRS or if the scan setting “Blank page detection” is enabled.
- Scanning with VRS: Separation is done without taking into account the blank pages. So if you have a batch of all single documents with a blank page on the rear side, you have to put the split number to one.
- Scanning with the scan setting “Blank page detection enabled”: Blank pages are deleted during separation. So if you have a batch of all single documents with a blank page on the rear side, you have to put the split number to two.
- Split each … pages: select this tab if you want that the separation is done after the selected number of pages.
- When scanning one recto verso paper, you will have two documents if the split each page setting is set to one.
- Blank pages are deleted when scanning with VRS or if the scan setting “Blank page detection” is enabled.
- When scanning with VRS, if all pages are scanned, you will receive a popup “Out of paper”. If you want to continue with scanning, put more papers on the scanner and the scanning will continue automatically. If you want to stop, click Cancel.
- If scanning without VRS, repeat the scan steps if you want to scan more pages.
- You can change the scan settings by clicking on
 (Settings)
- Proxy settings: has to be enabled when you are behind a proxy server. Contact your system administrator for the proxy server details.
- Blank page detection: enable if you want to delete blank pages. You have the possibility to determine the intensity of the blank page detection.
- Page settings:
- Page size: A5, A4, A3
- Page orientation: landscape or portrait
- Logging: enable and define a path if you want to keep a log file of the scan application.
- Put your papers on the scanner and click on

- 2) File import:
- Click on
 (Add from file) to import pdf/tiff/jpeg files. A browser will appear to select the import files.
 - Select the files you want to import.
- If you want to select multiple files, using the “Ctrl” button.
- Blank pages are deleted if configured in the scan settings.
- In file import, you can work also with separator sheets in order to do the separation.
- If you want to automatically split the imported file in multiple documents, you can select Split on import and define the number of pages.
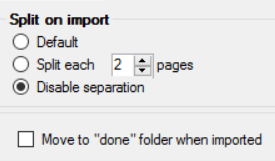
- Click on

1.4 Validation of the separation
After scanning you will see in the left pane an overview of all the scanned documents with their different pages (thumbnails). In the right pane you will see the image of the selected page.
Following actions can be performed on the scanned pages:
- Put pages into a new document by clicking
 (Add a new document).
 - Split a document by Click
 (Split the selected document), a new document will be created from this page on.
 - Click
 (Remove selection) to delete the selected document or page.
 - Click
 (Rotate selected images left)
  (Rotate selected images right) to rotate the images.
 - Click
 (Save and close) to save the scan batch without sending to OCR.
 - Click
 (Zoom factor) to scale the thumbnails.
 - You can drag and drop the selected pages in a document or to another document.
1.5 Release to recognition server
Click on ![]() (Save Send) to save the batch and send it to the OCR
(Save Send) to save the batch and send it to the OCR
1.6 Print Separation sheet
Location: Webscanning
To print the separation sheet click on Actions and Separation sheet.
A pdf will appear with the separation sheet, now you can print this separation sheet or save it.