Difference between revisions of "Approval manual"
| Line 1: | Line 1: | ||
Approving documents can be done in 2 different ways: | Approving documents can be done in 2 different ways: | ||
| − | * Automatically, via the [[Approval_manual#Auto flow|auto flow]] | + | * Automatically, via the [[Approval_manual#Auto flow|auto flow]]. This is done when documents are allowed to be processed automatically. For example: an invoice for electricity comes every month. The booking of such invoices is similar every month. These invoices can be processed manually to save time. |
| − | * Manually, via the [[Approval_manual#Manual flow|manual flow]]<br/> | + | * Manually, via the [[Approval_manual#Manual flow|manual flow]]. This is done when documents are processed manually and they need to be approved. Mostly, this occurs for bookings that are a little more complicated.<br/> |
<br/> | <br/> | ||
| + | When a document is already in the approval flow, there are still two actions which can be performed on it: | ||
| + | * Sending it in [[Approval_manual#Side-step|side-step]] to another approver. | ||
| + | * Sending it [[Approval_manual#Informative|informatively]] to another approver. | ||
==Auto flow== | ==Auto flow== | ||
Via the [[image:send.png|link=]] "Auto flow" button you are able to send a document in the automatic flow. This means that you have defined 1 or more TOA (Table Of Authorities) rules and the document is sent to the right approver. You don't have to think about which document should go to which approver, so this could save you a lot of time. | Via the [[image:send.png|link=]] "Auto flow" button you are able to send a document in the automatic flow. This means that you have defined 1 or more TOA (Table Of Authorities) rules and the document is sent to the right approver. You don't have to think about which document should go to which approver, so this could save you a lot of time. | ||
| Line 136: | Line 139: | ||
==Informative== | ==Informative== | ||
| + | When a document is in the approval flow, an action button [[image:informative.png|link=]] "Informative" is available.<br/> | ||
| + | This functionality is used to send a document informatively to another approver. This approver does not need to do anything with it. Clicking this button results in a pop-up screen being opened.<br/> | ||
| + | <br/>[[image:informative_popup.png|link=]]<br/> | ||
| + | <br/> | ||
| + | Fill in the approver(s) you wish to send the document to and click ''"Ok"''. | ||
Revision as of 13:34, 25 October 2016
Approving documents can be done in 2 different ways:
- Automatically, via the auto flow. This is done when documents are allowed to be processed automatically. For example: an invoice for electricity comes every month. The booking of such invoices is similar every month. These invoices can be processed manually to save time.
- Manually, via the manual flow. This is done when documents are processed manually and they need to be approved. Mostly, this occurs for bookings that are a little more complicated.
When a document is already in the approval flow, there are still two actions which can be performed on it:
- Sending it in side-step to another approver.
- Sending it informatively to another approver.
Contents
1 Auto flow
Via the ![]() "Auto flow" button you are able to send a document in the automatic flow. This means that you have defined 1 or more TOA (Table Of Authorities) rules and the document is sent to the right approver. You don't have to think about which document should go to which approver, so this could save you a lot of time.
"Auto flow" button you are able to send a document in the automatic flow. This means that you have defined 1 or more TOA (Table Of Authorities) rules and the document is sent to the right approver. You don't have to think about which document should go to which approver, so this could save you a lot of time.
There are 2 possibilities to manage the TOA rules:
- You have an intern user which has the rights to manage those rules.
- You let us do the management.
The user with the rights to edit the TOA rules can do this as follows:
- Click the "Settings" option in the upper right corner of the screen (right next to "My account").
- Choose
 "Workflow" from the settings screen.
 - Make sure you have a company selected (see "Selecting a company" for more information).
- Choose the document type for which you would like to edit the TOA rules.
- Incoming invoices
- Outgoing invoices
- Click the
 "Edit rules" button to edit the rules.
 - Create/edit rule(s). See below for more information.
- Click
 "Save" to save your changes. Click
  "Close" to quit without saving unsaved changes.
1.1 Import and export TOA rules via Excel
| Note that this is the recommended way to make use of TOA rules |
Via the ![]() "Export" button it's possible to export the already existing TOA rules to an Excel file.
"Export" button it's possible to export the already existing TOA rules to an Excel file.
The ![]() "Import" button allows you to upload an Excel file with TOA rules configured in it. This Excel file has to contain all the fields that are available in your environment. These fields can be found below.
"Import" button allows you to upload an Excel file with TOA rules configured in it. This Excel file has to contain all the fields that are available in your environment. These fields can be found below.
An example:

| For more information about the different fields and how the different approvers are configured, see below. |
| Make sure you use the codes of the different fields! Not the name of the company, the account, the approver(s), ... |
1.2 Create TOA rule
Click the ![]() "Add rule" icon to create a TOA rule. A line appears in the list of rules. This line is available to edit.
"Add rule" icon to create a TOA rule. A line appears in the list of rules. This line is available to edit.
There are different fields which you can configure:
- All environments:
- Supplier/Customer
- Account
- Approvers
- EIS specific fields:
- Cost unit
- Cost center
- OIS specific fields:
- Journal
- Cost place
- Net amount
- VIS specific fields:
- Journal
- Place
- Sort
- Net amount
- Remark
For each field (except Approvers) it's possible to define a condition. The posting line(s) have to meet the condition(s) in order to be sent to the right approver.
- Between: enter a value in the "From Code" and "To Code" that the posting line(s) have to meet. The value has to be a code of the selected field.
- Empty: the selected field has to be empty.
- Equals: the selected field has to equal a certain code. Choose the right code from the lookup list.
- In: enter a comma separated list of codes.
- Inactive: inactivate the comparison of this field. This is the default value.
- Like: enter a value to which the input must look like.
- Not empty: the selected field cannot be empty.
1.2.1 Define the approvers
The easiest way to explain the way to work with approvers is through an example:

There are a few different conditions here:
- When the posting lines or the net amount header field have an amount up to and including 500:
- The document is sent to Approver 1, Approver 2 and Approver 3.
- Approver 1 OR Approver 2 has to approve.
- Approver 3 also has to approve.
- When Approver 1 OR Approver 2 AND Approver 3 approved, the document is sent to Approver 4 and Approver 5
- Approver 4 has to approve the document.
- Approver 5 receives the document informatively.
- The document is sent to Approver 1, Approver 2 and Approver 3.
| Note that when an approver changes a value in the document, the TOA rules are recalculated. If Approver 4 for example changes an account, the document is rechecked against all available TOA rules. |
Add an AND AFTER relation by using the ![]() "Add step" button.
"Add step" button.
Remove an AND AFTER relation by using the ![]() "Remove step" button.
"Remove step" button.
Add an AND relation by using the ![]() "Add approver" button.
"Add approver" button.
Remove an AND relation by using the ![]() "Remove approver" button.
"Remove approver" button.
Add an OR relation by typing an extra approver in the same textbox.
Remove an OR relation by clicking the cross right next to the name of the approver.
| Keep in mind that when you remove the approver, it just clears the entered values. The TOA line stays. |
1.3 Edit TOA rule
The available lines in the list of rules are editable. Edit the one you like and click ![]() "Save".
"Save".
1.4 Remove TOA rule
Click the ![]() "Remove rule" at the beginning of a line to remove the rule.
"Remove rule" at the beginning of a line to remove the rule.
2 Manual flow
Via the ![]() "Manual flow" button you are able to send a document manually in the approval flow.
"Manual flow" button you are able to send a document manually in the approval flow.
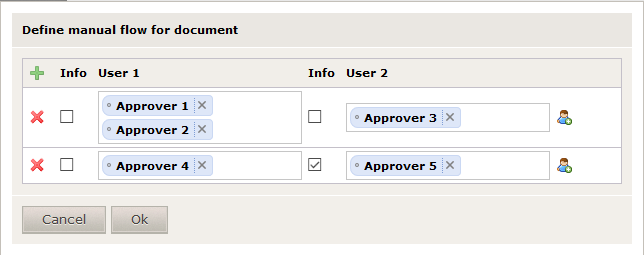
Defining the approvers to send the document to works similar to defining them for the auto flow. The only difference is the definition in the pop-up screen.
The example below works exactly the same as the example for the auto flow:

There are a few different conditions here:
- When the posting lines or the net amount header field have an amount up to and including 500:
- The document is sent to Approver 1, Approver 2 and Approver 3.
- Approver 1 OR Approver 2 has to approve.
- Approver 3 also has to approve.
- When Approver 1 OR Approver 2 AND Approver 3 approved, the document is sent to Approver 4 and Approver 5
- Approver 4 has to approve the document.
- Approver 5 receives the document informatively.
- The document is sent to Approver 1, Approver 2 and Approver 3.
Add an AND AFTER relation by using the ![]() "Add step" button.
"Add step" button.
Remove an AND AFTER relation by using the ![]() "Remove step" button.
"Remove step" button.
Add an AND relation by using the ![]() "Add approver" button.
"Add approver" button.
Add an OR relation by typing an extra approver in the same textbox.
Remove an OR relation by clicking the cross right next to the name of the approver.
Clicking "Ok" results in the document being sent to the defined approver(s).
3 Side-step
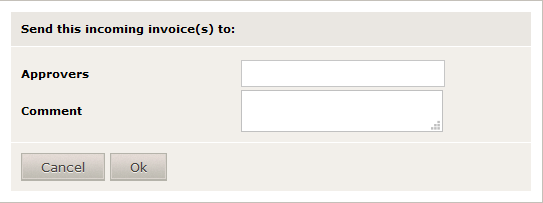
Sending a document is possible via the ![]() "Side-step" button. Clicking this button results in following screen:
"Side-step" button. Clicking this button results in following screen:

Following fields are available:
- Approvers: fill the name of the approver(s) you wish to send the document in side-step to.
- Comment: fill in a comment you wish to send with the document. This field is not required.
Click "Ok" to send the document.
4 Informative
When a document is in the approval flow, an action button ![]() "Informative" is available.
"Informative" is available.
This functionality is used to send a document informatively to another approver. This approver does not need to do anything with it. Clicking this button results in a pop-up screen being opened.

Fill in the approver(s) you wish to send the document to and click "Ok".