Approval manual
Approving documents can be done in 2 different ways:
- Automatically, via the auto flow. Based on the data on the invoice, the auto flow will automatically determine the approver(s) and send the invoice to the approval flow without some manual action. For example: an invoice for electricity comes every month. Every month, Employee A (Accounts Payable) has to manually send the invoice to Employee B (Approver). With the auto flow enabled, this manual action can be skipped and time will be saved.
- Manually, via the manual flow. When the booking of the invoices is a little more complicated, the invoices can be sent manually to the right approver.
When a document is already in the approval flow, there are still two actions which can be performed on it:
- Sending it in side-step to another approver.
- Sending it informatively to another approver.
Contents
1 Auto flow
| Defining the rules for auto flow is done best via Excel! |
Via the ![]() "Auto flow" button you are able to send a document in the automatic flow. This means that you have defined 1 or more TOA (Table Of Authorities) rules and the document is sent to the right approver. You don't have to think about which document should go to which approver, so this could save you a lot of time.
"Auto flow" button you are able to send a document in the automatic flow. This means that you have defined 1 or more TOA (Table Of Authorities) rules and the document is sent to the right approver. You don't have to think about which document should go to which approver, so this could save you a lot of time.
There are 2 possibilities to manage the TOA rules:
- You have an intern user which has the rights to manage those rules.
- You let us do the management.
The user with the rights to edit the TOA rules can do this as follows:
- Click the "Settings" option in the upper right corner of the screen (right next to "My account").
- Choose
 "Workflow" from the settings screen.
 - Make sure you have a company selected (see "Selecting a company" for more information).
- Choose the document type for which you would like to edit the TOA rules.
- Incoming invoices
- Outgoing invoices
- Click the
 "Edit rules" button to edit the rules.
 - Create/edit rule(s). See below for more information.
- Click
 "Save" to save your changes. Click
  "Close" to quit without saving unsaved changes.
1.1 Create TOA rules
| You need specific user rights to add TOA rules! |
1.1.1 Via Excel
| Note that this is the recommended way to create TOA rules. |
Via the ![]() "Export" button it's possible to export the already existing TOA rules to an Excel file.
"Export" button it's possible to export the already existing TOA rules to an Excel file.
The ![]() "Import" button allows you to upload an Excel file with TOA rules configured in it. This Excel file has to contain all the fields that are available in your environment:
"Import" button allows you to upload an Excel file with TOA rules configured in it. This Excel file has to contain all the fields that are available in your environment:
- All environments:
- Supplier/Customer
- Account
- Approvers
- Additional EIS specific fields:
- Cost unit
- Cost center
- Additional OIS specific fields:
- Journal
- Cost place
- Net amount
- Additional VIS specific fields:
- Journal
- Place
- Sort
- Net amount
- Remark
| Make sure you use the codes of the different fields and id's for users! Not the name of the company nor the account or the approver names, ... |
An example:

For each field (except Approvers) it's possible to define a condition. The header-/posting line(s) have to meet the condition(s) in order to be sent to the right approver.
- EQUALS: the selected field has to equal a certain code.
- BETWEEN: the selected field has to be between 2 given values, these values need to have the same number of digits.
- GREATER: the selected field has to be greater than the given value. This only is available for numeric fields.
- GREATER_OR_EQUALS: the selected field has to be greater or equal than the given value. This only is available for numeric fields.
- LESS: the selected field has to be lower than the given value. This only is available for numeric fields.
- LESS_OR_EQUALS: the selected field has to be lower or equal than the given value. This only is available for numeric fields.
- EMPTY: the selected field has to be empty.
- NOT_EMPTY: the selected field cannot be empty.
- INACTIVE: inactivate the comparison of this field.
| The operators above are ordered from high to low importance. When two or more rules are matching with the document (or lines when using line level approval), the importance of the operators will be taken into account. A higher importance of the operator means a higher importance of the rule. |
The example explained:
- When the posting lines or the net amount header field have an amount up to and including 500:
- The document is sent to Approver 1, Approver 2 and Approver 3.
- Approver 1 OR Approver 2 has to approve.
- Approver 3 also has to approve.
- When Approver 1 OR Approver 2 AND Approver 3 approved, the document is sent to Approver 4 and Approver 5
- Approver 4 has to approve the document.
- Approver 5 receives the document informatively.
- The document is sent to Approver 1, Approver 2 and Approver 3.
| Note that when an approver changes a value in the document, the TOA rules are recalculated. If Approver 4 for example changes an account, the document is rechecked against all available TOA rules. |
How to add different relations
Add an AND AFTER relation by adding two extra columns "Amount" and "Approver #" with # being the count of the approver fields defined.
Add an AND relation by using a semicolon (;).
Add an OR relation by typing a hyphen (-) between the approvers.
Add an INFORMATIVE by typing (i) before the name of the approver.
1.1.2 Manually
Example:

There are different fields which you can configure:
- All environments:
- Supplier/Customer
- Account
- Approvers
- EIS specific fields:
- Cost unit
- Cost center
- OIS specific fields:
- Journal
- Cost place
- Net amount
- VIS specific fields:
- Journal
- Place
- Sort
- Net amount
- Remark
For each field (except Approvers) it's possible to define a condition. The posting line(s) have to meet the condition(s) in order to be sent to the right approver.
- Equals: the selected field has to equal a certain code. Choose the right code from the lookup list.
- Between: the selected field has to be between 2 given values, these values need to have the same number of digits.
- Greater: the selected field has to be greater than the given value. This only is available for numeric fields.
- Greater or equals: the selected field has to be greater or equal than the given value. This only is available for numeric fields.
- Less: the selected field has to be lower than the given value. This only is available for numeric fields.
- Less or equals: the selected field has to be lower or equal than the given value. This only is available for numeric fields.
- Empty: the selected field has to be empty.
- Not empty: the selected field cannot be empty.
- Inactive: inactivate the comparison of this field. This is the default value.
| The operators above are ordered from high to low importance. When two or more rules are matching with the document (or lines when using line level approval), the importance of the operators will be taken into account. A higher importance of the operator means a higher importance of the rule. |
The example explained:
- When the posting lines or the net amount header field have an amount up to and including 500:
- The document is sent to Approver 1, Approver 2 and Approver 3.
- Approver 1 OR Approver 2 has to approve.
- Approver 3 also has to approve.
- When Approver 1 OR Approver 2 AND Approver 3 approved, the document is sent to Approver 4 and Approver 5
- Approver 4 has to approve the document.
- Approver 5 receives the document informatively.
- The document is sent to Approver 1, Approver 2 and Approver 3.
| Note that when an approver changes a value in the document, the TOA rules are recalculated. If Approver 4 for example changes an account, the document is rechecked against all available TOA rules. |
Add an AND AFTER relation by using the ![]() "Add step" button.
"Add step" button.
Remove an AND AFTER relation by using the ![]() "Remove step" button.
"Remove step" button.
Add an AND relation by using the ![]() "Add approver" button.
"Add approver" button.
Remove an AND relation by using the ![]() "Remove approver" button.
"Remove approver" button.
Add an OR relation by typing an extra approver in the same textbox.
Remove an OR relation by clicking the cross right next to the name of the approver.
| Keep in mind that when you remove the approver, it just clears the entered values. The TOA line stays. |
1.1.3 Use case
Taking into account the above configuration of a TOA rule, a document will be sent into the flow as follows: When the posting lines or the net amount header field have an amount up to and including 500:
- The document is sent to Approver 1, Approver 2 and Approver 3.
- Approver 1 OR Approver 2 has to approve.
- Approver 3 also has to approve.
| The second block of approvers don't have to approve the document. The first block of approves is allowed to approve documents with an amount up to and including 500. |
When the posting lines or the net amount header field have an amount higher than 500:
- The document is sent to Approver 1, Approver 2 and Approver 3.
- Approver 1 OR Approver 2 has to approve.
- Approver 3 also has to approve.
- When Approver 1 OR Approver 2 AND Approver 3 approved, the document is sent to Approver 4 and Approver 5
- Approver 4 has to approve the document.
- Approver 5 receives the document informatively.
1.1.4 Usage of the "BETWEEN" operator
When using the "BETWEEN" operator, you should take into account that the "Code" field of partners and lookup lists is a text field. This means that the values will be sorted alphabetically.
Examples:
- Accounts between 600000 and 609999 includes all accounts from 600000 up to and including 609999.
- Cost places between 1 and 199 includes all accounts between 1 and 199. This can be used for hierarchical cost places. All cost places below will be included:
- 1 Oost-Vlaanderen
- 11 Gent
- 111 Gent-Kouter
- 112 Gent-Vrijdagmarkt
- 12 Sint-Niklaas
- 13 Oudenaarde
- 2 Antwerpen
- 21 Antwerpen
- 22 Mechelen
1.2 Edit TOA rules
1.2.1 Via Excel
Use the ![]() "Export" button to download all the existing TOA rules. Edit the ones you would like to change and upload the file again via the
"Export" button to download all the existing TOA rules. Edit the ones you would like to change and upload the file again via the ![]() "Import" button.
"Import" button.
1.2.2 Manually
The available lines in the list of rules are editable. Edit the one you like and click ![]() "Save".
"Save".
1.3 Remove TOA rules
1.3.1 Via Excel
Use the ![]() "Export" button to download all the existing TOA rules. Remove the lines of the rule you want to remove and upload the file again via the
"Export" button to download all the existing TOA rules. Remove the lines of the rule you want to remove and upload the file again via the ![]() "Import" button.
"Import" button.
1.3.2 Manually
Click the ![]() "Remove rule" at the beginning of a line to remove the rule.
"Remove rule" at the beginning of a line to remove the rule.
1.4 Line-level approval
When using the auto flow and having multiple posting lines in a document, it is possible to send certain posting lines to one approver and other posting lines to another.
Example:
Auto flow setup:
- Cost unit "Marketing" goes to Approver 1
- Cost unit "Sales" goes to Approver 2
Posting lines in the document:

When sending this document trough the auto flow, the first line will be sent to Approver 1 and the second line will be sent to Approver 2. This means that Approver 1 and Approver 2 will receive this document and both have to approve.
The document will be shown with one editable line and one greyed out line for both approvers.
Approver 1:

Approver 2:

2 Manual flow
Via the ![]() "Manual flow" button you are able to send a document manually in the approval flow.
"Manual flow" button you are able to send a document manually in the approval flow.
Defining the approvers to send the document to works similar to defining them for the auto flow. The only difference is the definition in the pop-up screen.
The example below works exactly the same as the example for the auto flow:
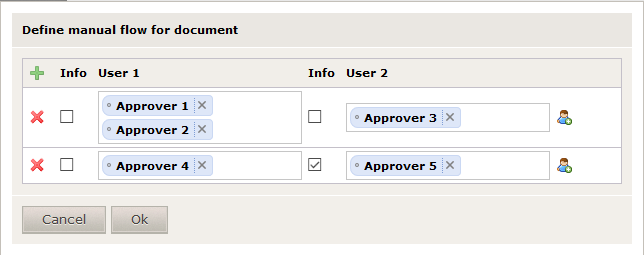
There are a few different conditions here:
- When the posting lines or the net amount header field have an amount up to and including 500:
- The document is sent to Approver 1, Approver 2 and Approver 3.
- Approver 1 OR Approver 2 has to approve.
- Approver 3 also has to approve.
- When Approver 1 OR Approver 2 AND Approver 3 approved, the document is sent to Approver 4 and Approver 5
- Approver 4 has to approve the document.
- Approver 5 receives the document informatively.
- The document is sent to Approver 1, Approver 2 and Approver 3.
Add an AND AFTER relation by using the ![]() "Add step" button.
"Add step" button.
Remove an AND AFTER relation by using the ![]() "Remove step" button.
"Remove step" button.
Add an AND relation by using the ![]() "Add approver" button.
"Add approver" button.
Add an OR relation by typing an extra approver in the same textbox.
Remove an OR relation by clicking the cross right next to the name of the approver.
Clicking "Ok" results in the document being sent to the defined approver(s).
3 Side-step
Sending a document is possible via the ![]() "Side-step" button. Clicking this button results in following screen:
"Side-step" button. Clicking this button results in following screen:
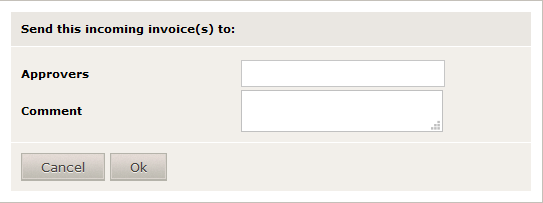
Following fields are available:
- Approvers: fill the name of the approver(s) you wish to send the document in side-step to.
- Comment: fill in a comment you wish to send with the document. This field is not required.
Click "Ok" to send the document.
4 Informative
When a document is in the approval flow, an action button ![]() "Informative" is available.
"Informative" is available.
This functionality is used to send a document informatively to another approver. This approver does not need to do anything with it. Clicking this button results in a pop-up screen being opened.
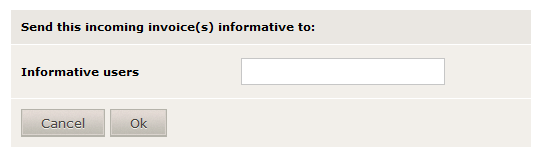
Fill in the approver(s) you wish to send the document to and click "Ok".